
 So I mentioned before about the possibilities of the bright light and long run time of LED lights using the Luxeon I, III and V star LEDs. Well I've finally got it figured out and now I'm playing with all the possibilities. There are so many fun ways to use them too.
For Example:
Using a 600 gram 18.5V 6150mAh battery, you could run a 320 lumen 4x3W light on full power for over 6 hours! The battery, LED driver and LEDs cost just $200 too. HID eat your heart (and wallet) out.
Or how about a 120 lumen single Luxeon V powered by a 150 gram (lighter than a bike tube), $25 11.1V 2000mAh battery that lasts for 4 hours! You could also run a 160 lumen double Luxeon III light powered by the same battery for almost 2.5 hours.
There's always the triple Luxeon III light producing 240 lumens and you could power it with a 368 gram, $55 14.8V 4000mAh battery that lasts for almost 4.5 hours.
For the ultimate cheap and superlight helmet mounted light you could power a single Luxeon III light producing 80 lumens with a $13 80 gram 7.2V 1400mAh battery for well over 2 hours.
For the ultimate in battery efficiency for LED lights, a triple Luxeon I system powered by the same 368 gram, $55 14.8V 4000mAh battery as above would produce 135 lumens and run for over 14 hours!
As you can see the combinations are endless so I'll stop there for now. If you want to start building one yourself keep reading. I'm going to assume you can fashion your own housing, do some basic soldering and can source up wires, switches and the other misc parts. If not there are plenty of great premade light out there and you can check out the LED Gear Review to see which one is best for you.
Main components:
 Buckpuck LED Driver - LEDs need specific currents so they require a driver to maintain a constant current as battery voltage drops. You could also use a resistor but your light will slowly dim and it's just not as cool. The Buckpuck is ~$20 and you basically need one for each "light" but it can power multiple LEDs. The 1W LEDs use 350mA drivers, the 3W and 5W LEDs use 700mA drivers and the 3W LEDs only can also use a 1000mA driver. LED Supply has the great Buckpuck drivers in 350,700 and 1000mA currents prewired for easy of installation.
The Buckpuck is roughly 85% efficient and requires 2V DC more input voltage than your combined LED forward voltage. For more here is the datasheet.
 Luxeon LED - These come in 1 Watt, 3 Watt and 5 Watt varieties producing 45 lumens, 80 lumens and 120 lumens respectively. The 5W lights are much more expensive (almost 4 times) than the other 2 kinds, run hotter and last the least amount of time. However for the most light output with just 1 small light they are pretty darn cool. The normal forward voltages of the lights are 3.4V (1W), 3.9V (3W @ 1000mA) and 6.8V (5W). Again this is important so you can match the total forward LED voltage plus 2V for the Buckpuck to your battery voltage. LED Supply also has all the Luxeon's you want at great pieces here in the USA. You can also get these at Dotlight in Germany or Luxeon Star.
Luxeon I Star Datasheet
Luxeon III Star Datasheet
Luxeon V Star Datasheet
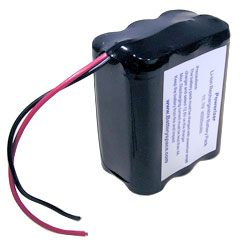 Battery - This is often the most expensive part of the project but depending on what runtime and weight you're looking for you can keep it pretty inexpensive. Lithium Ion batteries are the smallest, lightest and most expensive type. If these are in your budget they are definitely worth the cost. Nickel Metal Hydride batteries are the alternative to Li-Ion for less cost with a little more size and weight. Check out Battery Space for a lot of options.
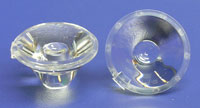 Miscellaneous - There are a few more things you're going to need to finish your light. You'll need some wire to connect everything and some thermal epoxy to fill any air gaps. You will also need some optics to put on your LED. These can be lenses or reflectors. There are tons of options from narrow 4 degree lenses to wide 25 degree or even oval lenses. I'm not sure what the best options are yet but luckily they are cheap so you can experiment with them. I've ordered at least one of each kind to try out on my projects. You'll also need some switches, connectors, a heat sink and of course a housing. This is the part where you'll have to be creative and if you're lucky enough to have a friend with access to a lathe you can make some pretty nice stuff.
You can also find great information on DIY LED lights here on the Singletrack forums. And if you just want to buy some lights already made, check out the LED Gear Review. Good luck with your projects, I'll post mine here as soon as LED Supply gets their new 3 LED optics in stock and ships them out.
7 comments:
Argh! This is all over my head. I just bought a Doubleshot. I got a killer deal, but all this DIY stuff makes me wonder if I acted to soon.
I have been toying with the idea of unloading my HID system and going with a nice LED set up to replace it. Lighter weight, longer burn times and a free'd up bottle cage!
I'll be following your progress with this closely!
The DIY stuff takes a bit of work but it's not too complicated. The stuff out there like the Doubleshot is awesome but the don't make it easy to configure for long run times or other batteries. I'm hoping to develop a couple lights that can use Li-ion batteries and then easily swap to a bank of AA/C throw aways for longer trips where you can't recharge.
At work I've got the capability to prototype plenty of housings so that makes a big difference too. I'm hoping to have one or 2 housing ideas to post up soon.
I love you despite your nerdiness. :)
Chris, 14 hours. I can see the plan for the 24 hour bike race assuming it reliable. You will need to get some solid field testing in different environments. Pretty amazing.
Todd
Thats a cool idea and I well be very interested in checking it out when your done. Cool blog
It is a wonderful DIY, and it's so impressive. http://www.pellets-mill.com/htm/pelletsmill-cn
This is a really interesting look at LED lighting options.
Post a Comment